
How to Stand Better
- Aug 10, 2025
- 4 min read
Updated: 3 days ago
Try this yourself. Be tall and place one hand on your low back and the other at the back of your neck and lean back slightly to feel these muscles relax, then round forward to feel these muscles become firm. Our posture affects our muscles. The habit of how we position our bodies can lead to tight muscles, stressed ligaments and tendons, and compressed joints and nerves.


Fifty years ago, Dr. Vladimir Janda identified patterns of tightness and weakness in sedentary people, and these crossed syndromes explain why maintaining good posture can feel impossible. In this article I explain good standing posture and how to create balanced joints that allow you to apply what I recommend.

Before learning these 2 things walking would cause me pain. In this post I share the simplest strategy for improving your standing.


Step 1: Foot Strike

Walk with straight and narrow feet directly under your hips. Spread the toes as much as possible and place your weight into the outer part of your foot and the toe pads. The outer part of the foot (lateral column) sits below the inner part of the foot (medial column), so we want to land with the outer part of the foot first when walking.

Keep the knees and hips soft as this helps to land lightly. If you're used to heel-striking you might have to slow down at first until you get comfortable walking with better technique.

How you make contact with the ground is the most important part of walking well. Unfortunately, modern shoes shift our weight to the inner parts of the feet, limit our ability to use our foot muscles, force excess heel contact, reduce ankle mobility, create bunions, and strain the plantar fascia.


Be barefoot or wear flat and wide shoes to mobilize and strengthen the feet. Here are the shoes I use and recommend. Most people struggle with getting weight to the outer parts of the feet, so I recommend getting the SoleSteps to experience how standing should feel on the feet. I explain what these are and how to use them in the 2 videos below.
Good Posture
The foot is the foundation of the body and good standing begins with the feet. Look at a baby's foot and you'll see it's like an upside down triangle with the widest part at the toes. Then look at an adult's foot and it doesn't look like that at all because our shoes have squeezed our toes together and deformed our feet.

If you want better posture, get better shoes - minimalist wide toe box shoes - or be barefoot as often as possible.
Here are the top-6 pairs of shoes I use and recommend today:
Doctors recommend shoe inserts, which can help reduce discomfort, but they're providing an external solution to an internal problem. Narrow shoes poorly distribute the weight in our feet and prevent us from using our toes. Shoe inserts are only a temporary fix to a permanent problem. For a permanent solution, we must learn how to distribute our weight in our feet.

It's common to hear people recommend heel contact and the tripod foot, but they misunderstand that without soft shoes, too much heel pressure would cause damage to our feet. This might work for lifting weights, but it doesn't work for walking or running.

We still want the tripod foot, but the weight of the foot should be distributed among 3 locations: Ball of the foot, outside ball of the foot, and the cuboid bone in front of the heel. The heel itself can touch the ground but only lightly and with little force.
One tool that helps you learn how to distribute the weight in your feet is the SoleSteps. All you have to do is stand on them and they teach you to distribute your weight to the cuboid bone and outside ball of the foot, which are both restricted contact points in modern narrow shoes.
The Sole Steps also teach you to externally rotate the hips so that the ankles, knees, and hips are all stacked on tope of one another.

Looking at how your shoes are wearing provides insight into your current walking habits. Do you notice if your shoes wear unevenly? If so, this is an insight that you can correct how you're distributing your weight. Keep a neutral ankle.


Once the foundation is strong, maintain a neutral spine with your ribs stacked over your hips and nose below your ears.


Keep the hips soft and slightly behind so that the large hip bones carry your weight instead of the hip flexor muscles.
This is how ancient statues depict humans and it's how babies walk before we corrupt them with poor posture training. Standing with the hips pushed forward will lead to tight hips and weak glutes, so always keep the hips slightly behind you.

Once your hips are positioned well, think about balancing your spine on your hips. Better posture balances bones, while worse posture uses muscles and ligaments to hold you up, which leads to chronic pain. When we focus on balance, better posture becomes easier and requires less effort than slouching.

Imagine there's a string at the back of your head pulling up to the sky and try to be as tall as possible.

To set your shoulders in place, reach back with one arm at a time like you’re trying to reach for something in the backseat of a car and then ‘anti-shrug’ your shoulders down to set your shoulder blades onto your rib cage.


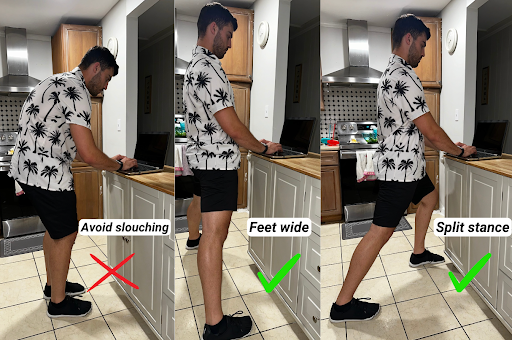
Standing desks are great as a break from sitting, but you can still slouch while standing! Any time you're forced to stand for a long time, stand with your feet wider than hip width apart - a straddle or split squat position - to prevent slouching while improving hip mobility.
Conclusion
Standing is one of the most basic things that we all do, but many never stop to consider how they're doing it or if their habits are helping or hurting them. Applying the tips I've shared in this article will help to ensure that standing is therapeutic and beneficial in keeping you healthy and pain-free.
If you want one-on-one attention to improve your posture and how you move, schedule a fitness consultation to get started working with me today.
Hope this helps! -Tom

Comments